Lesson 18
Live Camera Feed (Hiwonder 7.3)
Connect to the ESP32-S3 Vision Module Hotspot and View the Stream
🎯 Learning Objectives
- Connect the ESP32-S3 vision module to your computer and confirm the COM port is recognized
- Connect to the vision module’s WiFi hotspot HW_ESP32S3CAM (AP direct mode)
- Open the live camera feed page at http://192.168.5.1 on phone or PC
- Use clear checkpoints to diagnose where things are failing (USB/COM vs WiFi vs browser/stream)
- Follow a slow, safe workflow (avoid COM1, power switch OFF when plugging USB, etc.)
✅ What Counts as “Done” for Lesson 18
- USB Check: Device Manager shows a new COM port when the board is plugged in
- WiFi Check: Your phone/PC connects to HW_ESP32S3CAM and stays connected
- Browser Check: http://192.168.5.1 loads (not a Google search, not a captive portal)
- Stream Check: You can start image transmission and see frames update
🗓️ Suggested Multi-Week Plan
Week 1 Goal: Reach the Stream Page
- COM port visible
- Join HW_ESP32S3CAM
- Load 192.168.5.1
- At least one successful “start transmission” attempt
Week 2 Goal: Make It Reliable
- Repeat the full setup from scratch without help
- Learn the “recovery” steps when it fails
- Test both phone and PC access
- Document the exact steps you used
🔌 Section 1: Device Connection (USB + Drivers)
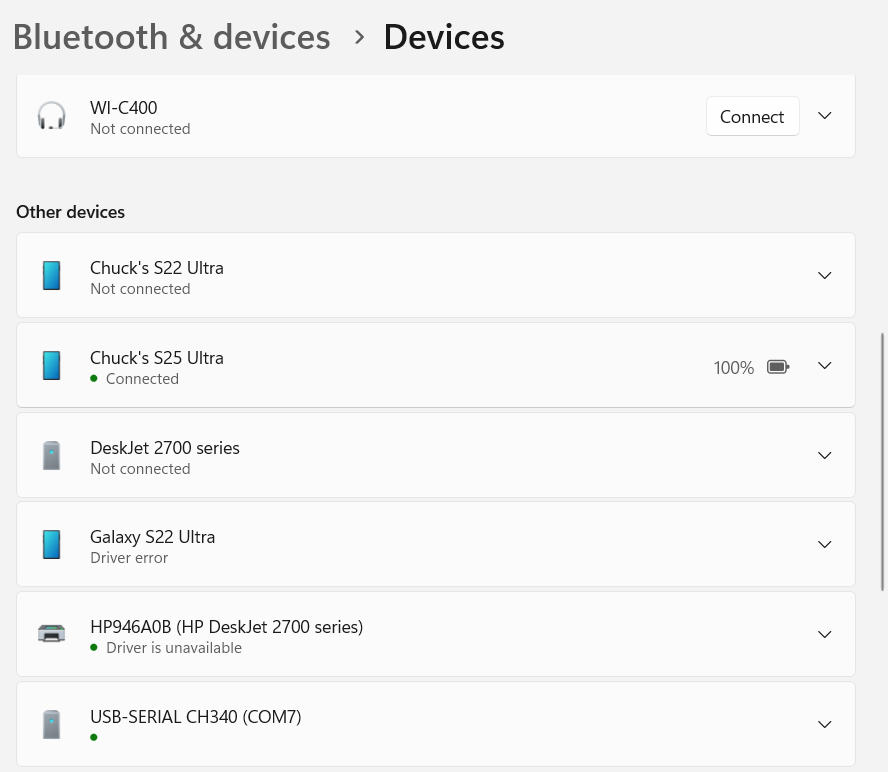
Connect the ESP32-S3 vision module to your computer using a Type-C cable. Then open Device Manager to confirm a COM port appears.
What it looks like (example)
Quick Checklist
- Cable: Must be a data-capable Type-C cable (some are charge-only)
- Port: Confirm a COM port appears in Device Manager
- Driver: Install CH34x driver if no port appears
- Port sanity: Do not use COM1 (that’s usually not your board)
Troubleshooting
If you don't see a COM port:
1) Try a different USB port
2) Try a different cable
3) Install CH34x driver
4) Reboot and check again
🧩 Section 1.5: “Which Part is Failing?” (A Fast Diagnostic)
When the live stream doesn’t work, the failure is usually in one of these buckets. Use this list to avoid random guessing.
- USB/COM failure: No COM port appears (cable/driver/board power)
- WiFi failure: Can’t see or can’t stay connected to HW_ESP32S3CAM
- Browser/network failure: Connected to hotspot, but 192.168.5.1 won’t load
- Stream failure: Page loads, but video/frames never show
📶 Section 2: Connect to the Hotspot (AP Mode)
The ESP32-S3 vision module creates a WiFi hotspot named HW_ESP32S3CAM. This method is called AP (Access Point) direct mode.
- Step 1: Open WiFi settings on your phone/PC
- Step 2: Connect to HW_ESP32S3CAM
- Step 3: Stay connected to that network while viewing the camera
📷 Section 3: Start Image Transmission (192.168.5.1)
After connecting to HW_ESP32S3CAM, open a browser and go to: http://192.168.5.1
What it looks like (example)
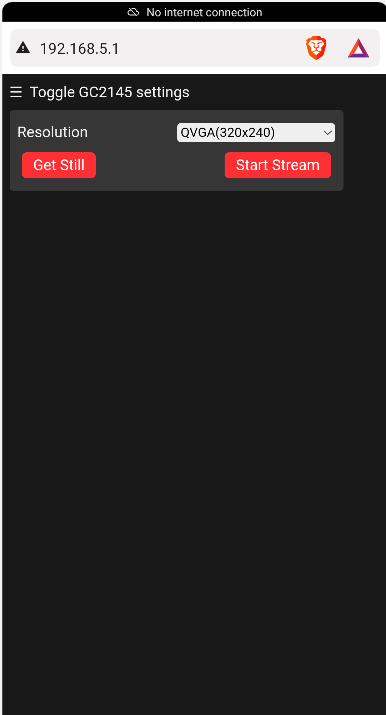
Expected Result
- You should see a page that can start image transmission
- If the page loads but no image appears, firmware may need to be reflashed
Slow Step-by-Step (Do Not Skip)
- Confirm you are connected to HW_ESP32S3CAM
- Type http://192.168.5.1 exactly (include http://)
- Wait for the page to fully load (be patient on the first load)
- Use the page control to start image transmission
- Wait for frames to appear (some modules take a moment to start)
Quick Troubleshooting
If 192.168.5.1 doesn't load:
1) Confirm you are connected to HW_ESP32S3CAM (not your home WiFi)
2) Disable VPN
3) Try a different browser
4) Power-cycle the ESP32-S3 vision module
🛠️ Section 4: Recovery Checklist (When It Stops Working)
If you previously flashed other firmware and the live feed stopped working, you may need to restore the image transmission firmware. Use this checklist to systematically recover.
- Hard reset: Power off, wait 10 seconds, power on
- WiFi reset: Forget HW_ESP32S3CAM network, reconnect
- Browser reset: Try another browser, or a private/incognito window
- Device swap: Try phone first, then PC (or the other way around)
- Firmware restore: If the stream still won’t start, reflash the correct 7.3 image transmission firmware
Firmware Restore (Detailed)
Use this when the hotspot works and the page loads, but the live feed won’t start (or you previously flashed a different vision firmware).
- Connect: Plug the ESP32-S3 vision module into your computer with a data-capable USB-C cable
- Open tool: Run flash_download_tool_3.9.7 (Hiwonder Firmware Flashing Tools)
- Select chip: Choose ESP32-S3
- Select firmware: Choose image_transmit.bin (the live camera feed / image transmission firmware)
- Select COM port: Pick the COM port that matches Device Manager. Avoid COM1.
- Erase first: Click ERASE and wait for it to finish
- Flash: Click START and wait for FINISH
- Restart: Disconnect USB and power-cycle the vision module
- Re-test: Connect to HW_ESP32S3CAM and load http://192.168.5.1
🔧 Hands-On Activity: Prove the Stream Works
Get the camera feed working on both a PC browser and a phone browser.
Activity Checklist
Materials Needed:
- ESP32-S3 vision module
- Phone or tablet with WiFi
- Computer with WiFi
- Type-C cable (data)
Step-by-Step Instructions:
- PC: Connect to HW_ESP32S3CAM and open 192.168.5.1
- Phone: Connect to HW_ESP32S3CAM and open 192.168.5.1
- Verify: Confirm the image updates (live feed)
- Document: Screenshot the page on PC and phone for your lab notebook
📋 Assessment & Homework
Programming Challenges
- Network Check: Write down the exact steps to get from "power on" to "live feed"
- Recovery Plan: Describe when you would reflash the image transmission firmware and why
- Troubleshooting: List 3 reasons 192.168.5.1 might not load and how to fix each
Research Assignment
Topic: AP Mode vs STA Mode
Write a one-page explanation of the difference between:
- AP (Access Point) mode: ESP32 creates a hotspot
- STA (Station) mode: ESP32 joins an existing WiFi network
Practical Exercises
- Verify the stream works at different distances between phone and vision module
- Test in a room with many WiFi networks and record if stability changes
- Optional: If the live feed fails, practice the firmware reflash workflow