Lesson 10: Output Devices and Actuators
Control the physical world with sound and servo motors
🔊 Create sound and precise movement with buzzers and servos
📚 Learning Objectives
By the end of this lesson, you will:
- • Control sound output devices (buzzers) and servo motors
- • Understand PWM control for servo positioning and sound frequency
- • Work with servo motors for precise positioning
- • Create interactive audio and motion feedback systems
Key Concepts:
- • PWM control for servo positioning and sound generation
- • Servo power requirements and buzzer control
- • Servo control signals and positioning
- • Sound generation and frequency control
🔊 Section 1: Sound Output with Buzzers
Types of Buzzers
Buzzers provide audio feedback in your projects. There are two main types, each with different control requirements and capabilities.
Active Buzzers
Control: Simple HIGH/LOW signals
Sound: Fixed frequency tone
Use: Alarms, notifications, simple beeps
Advantage: Easy to use, no frequency control needed
Passive Buzzers
Control: PWM signals with specific frequencies
Sound: Variable frequency tones and melodies
Use: Music, sound effects, variable pitch alerts
Advantage: Full control over pitch and tone
🔌 Section 1 Wiring Diagram
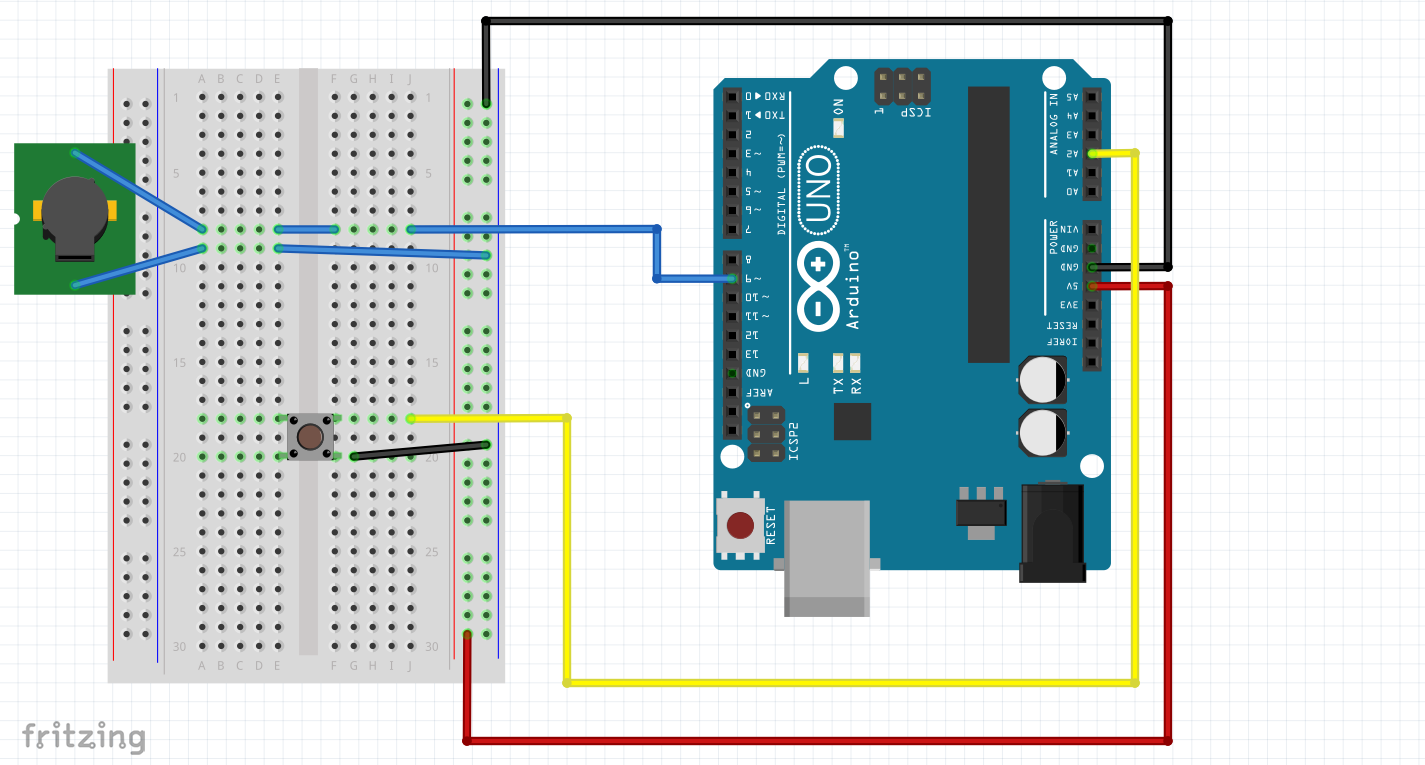
Connections: Buzzer positive → Pin 8, Buzzer negative → GND, Button → A2 & GND (with INPUT_PULLUP)
Basic Buzzer Control
Here's how to control both types of buzzers:
// Buzzer Control Example
const int buzzerPin = 8;    // Buzzer connected to pin 8
const int buttonPin = A2;   // Button for control

bool buttonPressed = false;
bool lastButtonState = HIGH;

void setup() {
  pinMode(buzzerPin, OUTPUT);
  pinMode(buttonPin, INPUT_PULLUP);
  Serial.begin(9600);
  Serial.println("Buzzer Control - Press button for sound");
}

void loop() {
  bool currentButtonState = digitalRead(buttonPin);

  // Check for button press
  if (lastButtonState == HIGH && currentButtonState == LOW) {
    buttonPressed = true;
    Serial.println("Button pressed - Playing sound");
  }

  if (buttonPressed) {
    // Play a simple beep pattern
    playBeepPattern();
    buttonPressed = false;
  }

  lastButtonState = currentButtonState;
}

void playBeepPattern() {
  // For active buzzer: simple on/off
  digitalWrite(buzzerPin, HIGH);
  delay(200);
  digitalWrite(buzzerPin, LOW);
  delay(100);
  digitalWrite(buzzerPin, HIGH);
  delay(200);
  digitalWrite(buzzerPin, LOW);

  // For passive buzzer: use tone() function
  // tone(buzzerPin, 1000, 200);  // 1000Hz for 200ms
  // delay(300);
  // tone(buzzerPin, 1500, 200);  // 1500Hz for 200ms
}
🔌 Section 2 Wiring Diagram
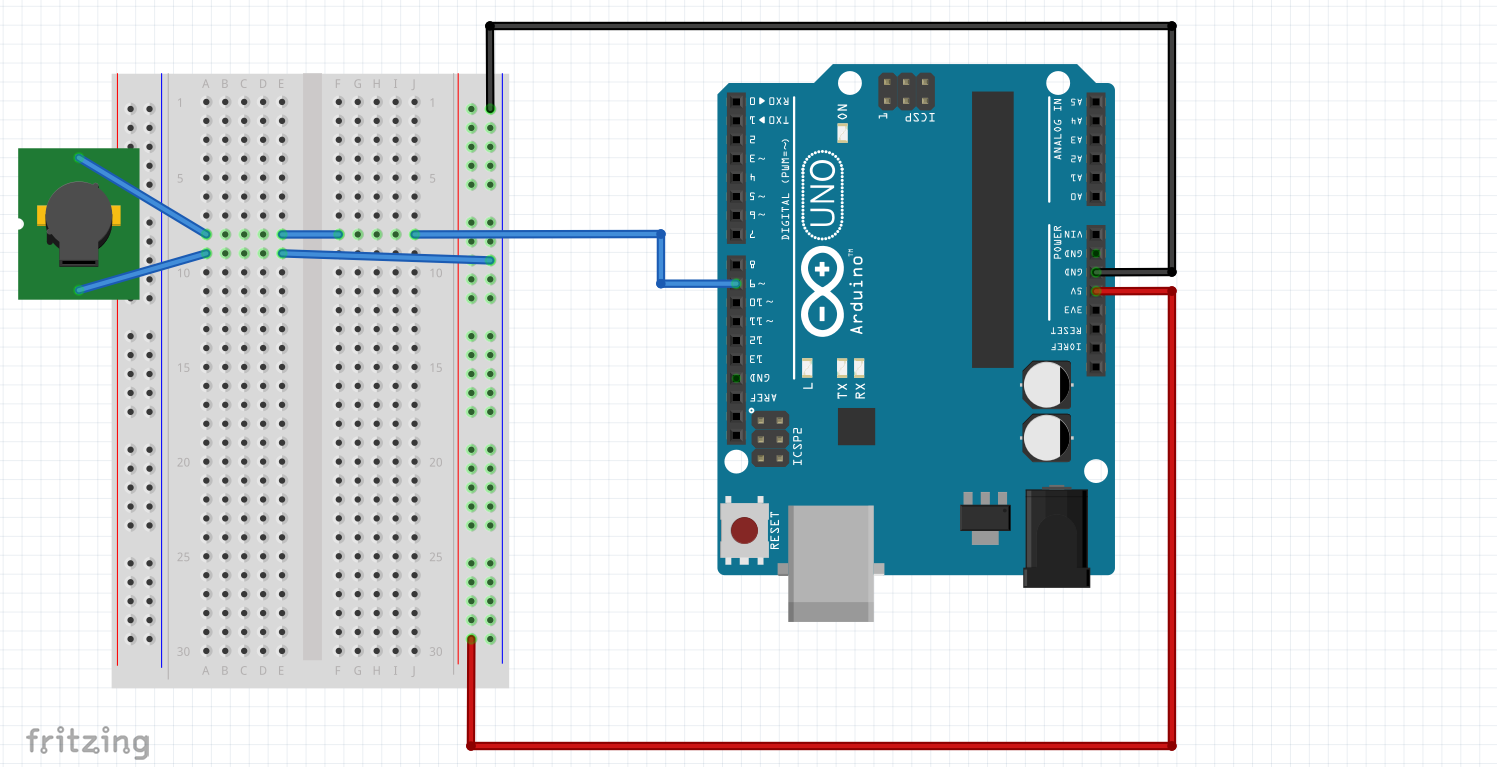
Musical Melody Setup: Buzzer positive → Pin 8, Buzzer negative → GND (for tone() function musical notes)
Musical Tones and Melodies
Create musical notes and simple melodies using the tone() function:
// Musical Melody Example
const int buzzerPin = 8;

// Note frequencies (in Hz)
#define NOTE_C4  262
#define NOTE_D4  294
#define NOTE_E4  330
#define NOTE_F4  349
#define NOTE_G4  392
#define NOTE_A4  440
#define NOTE_B4  494
#define NOTE_C5  523

// Simple melody: Twinkle Twinkle Little Star
int melody[] = {
  NOTE_C4, NOTE_C4, NOTE_G4, NOTE_G4, NOTE_A4, NOTE_A4, NOTE_G4,
  NOTE_F4, NOTE_F4, NOTE_E4, NOTE_E4, NOTE_D4, NOTE_D4, NOTE_C4
};

int noteDurations[] = {
  4, 4, 4, 4, 4, 4, 2,
  4, 4, 4, 4, 4, 4, 2
};

void setup() {
  Serial.begin(9600);
  Serial.println("Playing melody...");
  playMelody();
}

void loop() {
  // Play melody every 5 seconds
  delay(5000);
  Serial.println("Playing melody again...");
  playMelody();
}

void playMelody() {
  for (int i = 0; i < 14; i++) {
    int noteDuration = 1000 / noteDurations[i];
    tone(buzzerPin, melody[i], noteDuration);

    // Pause between notes
    int pauseBetweenNotes = noteDuration * 1.30;
    delay(pauseBetweenNotes);

    // Stop the tone
    noTone(buzzerPin);
  }
}
🔄 Section 2: Servo Motor Control
Understanding Servo Motors
Servo motors provide precise angular positioning, making them perfect for robotics, automation, and projects requiring controlled movement. They use PWM signals for position control rather than speed control.
Servo Characteristics:
- Position Control: Typically 0° to 180° range
- PWM Signal: 20ms period, 1-2ms pulse width
- Power: Usually 5V, separate power supply recommended
- Feedback: Built-in position sensing and control
- Accuracy: High precision positioning
🔌 Section 4 Wiring Diagram
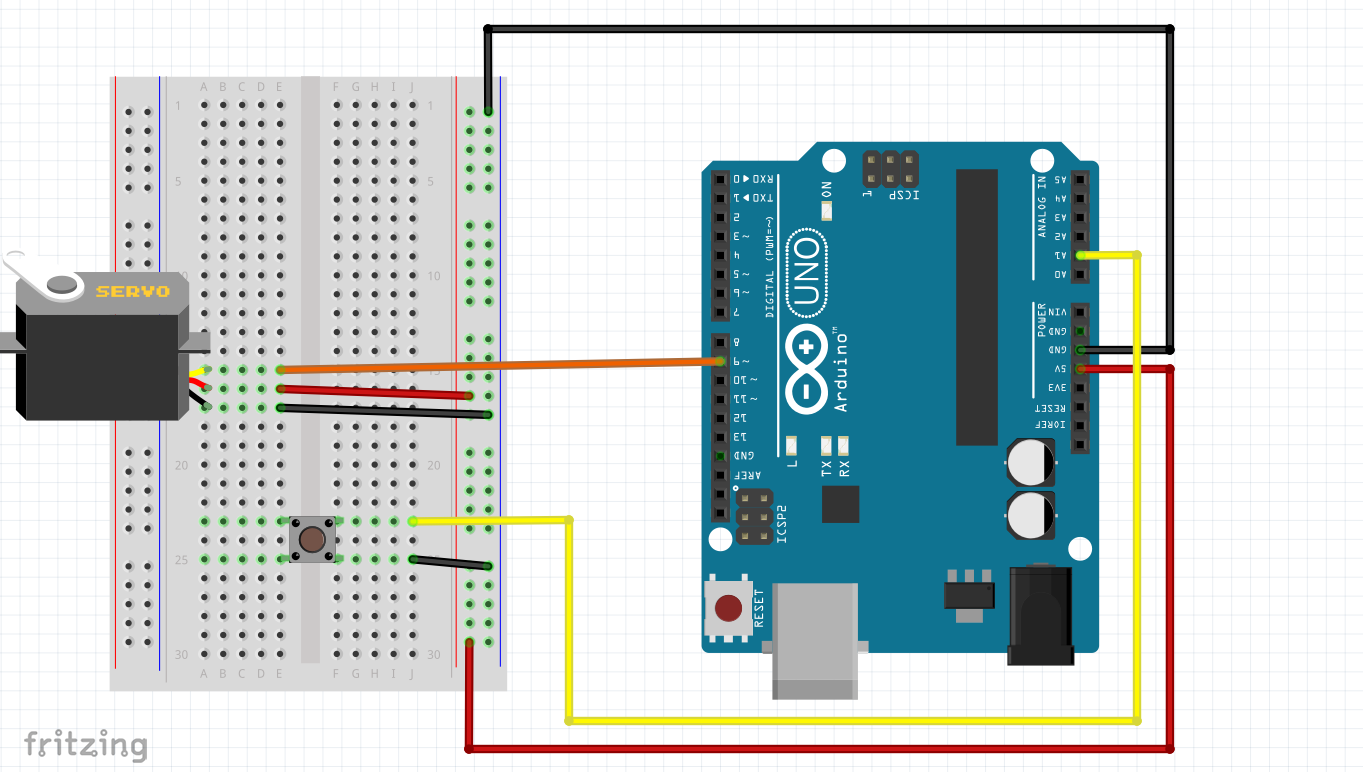
Servo Control Setup: Servo signal (orange/yellow) → Pin 9, Servo power (red) → 5V, Servo ground (brown/black) → GND, Potentiometer → A0
Basic Servo Control
Arduino's Servo library makes it easy to control servo position:
// Basic Servo Control Example
#include <Servo.h>

Servo myServo;              // Create servo object
const int servoPin = 9;     // Servo connected to pin 9
const int potPin = A0;      // Potentiometer for position control

int potValue = 0;           // Potentiometer reading
int servoPosition = 0;      // Servo position (0-180 degrees)

void setup() {
  myServo.attach(servoPin); // Attach servo to pin
  Serial.begin(9600);
  Serial.println("Servo Control - Turn potentiometer to move servo");
}

void loop() {
  // Read potentiometer value
  potValue = analogRead(potPin);

  // Map potentiometer value to servo position (0-180 degrees)
  servoPosition = map(potValue, 0, 1023, 0, 180);

  // Move servo to position
  myServo.write(servoPosition);

  // Display current values
  Serial.print("Pot: ");
  Serial.print(potValue);
  Serial.print(" | Servo Position: ");
  Serial.print(servoPosition);
  Serial.println(" degrees");

  delay(15);  // Small delay for servo to reach position
}
Servo Sweep and Patterns
Create automated servo movements and patterns:
// Servo Sweep Pattern Example
#include <Servo.h>

Servo myServo;
const int servoPin = 9;
const int buttonPin = 2;

int currentPosition = 90;   // Start at center position
bool sweepMode = false;     // Sweep mode flag
bool lastButtonState = HIGH;

void setup() {
  myServo.attach(servoPin);
  pinMode(buttonPin, INPUT_PULLUP);
  myServo.write(currentPosition);  // Move to center
  Serial.begin(9600);
  Serial.println("Servo Sweep - Press button to start/stop sweep");
}

void loop() {
  bool currentButtonState = digitalRead(buttonPin);

  // Check for button press to toggle sweep mode
  if (lastButtonState == HIGH && currentButtonState == LOW) {
    sweepMode = !sweepMode;
    Serial.print("Sweep mode: ");
    Serial.println(sweepMode ? "ON" : "OFF");
    delay(50);  // Debounce
  }

  if (sweepMode) {
    performSweep();
  }

  lastButtonState = currentButtonState;
}

void performSweep() {
  // Sweep from 0 to 180 degrees
  for (int pos = 0; pos <= 180; pos += 1) {
    myServo.write(pos);
    Serial.print("Position: ");
    Serial.println(pos);
    delay(15);

    // Check if sweep should stop
    if (digitalRead(buttonPin) == LOW) {
      sweepMode = false;
      break;
    }
  }

  // Sweep back from 180 to 0 degrees
  if (sweepMode) {
    for (int pos = 180; pos >= 0; pos -= 1) {
      myServo.write(pos);
      Serial.print("Position: ");
      Serial.println(pos);
      delay(15);

      // Check if sweep should stop
      if (digitalRead(buttonPin) == LOW) {
        sweepMode = false;
        break;
      }
    }
  }
}
🎵 Section 3: Combined Audio-Motion Control
Coordinated Sound and Movement
Combine buzzer and servo control to create synchronized audio-visual feedback systems. This demonstrates how multiple output devices can work together for enhanced user interaction.
🔌 Section 5 Wiring Diagram
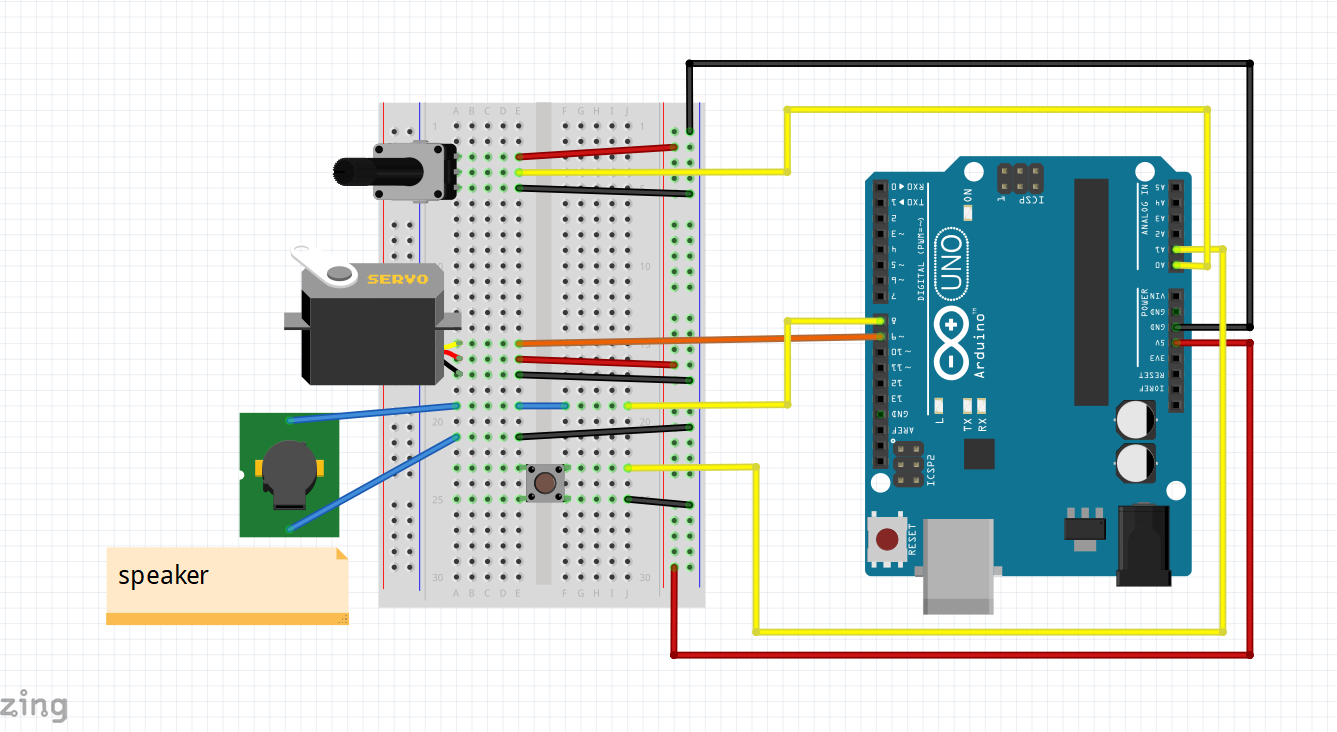
Synchronization Setup: Buzzer → Pin 8 & GND, Servo → Pin 9, 5V & GND, Button → A1 & GND, Potentiometer → A0 (for real-time control)
Audio-Motion Synchronization Code
Create coordinated patterns where servo position affects buzzer frequency:
// Combined Audio-Motion Control
#include <Servo.h>

Servo myServo;
const int servoPin = 9;
const int buzzerPin = 8;
const int buttonPin = A1;
const int potPin = A0;

bool systemActive = false;
bool lastButtonState = HIGH;
int servoPosition = 90;

void setup() {
  myServo.attach(servoPin);
  pinMode(buzzerPin, OUTPUT);
  pinMode(buttonPin, INPUT_PULLUP);
  myServo.write(servoPosition);
  Serial.begin(9600);
  Serial.println("Audio-Motion Control - Press button to activate");
}

void loop() {
  bool currentButtonState = digitalRead(buttonPin);

  // Toggle system on button press
  if (lastButtonState == HIGH && currentButtonState == LOW) {
    systemActive = !systemActive;
    Serial.print("System: ");
    Serial.println(systemActive ? "ACTIVE" : "INACTIVE");

    if (!systemActive) {
      noTone(buzzerPin);  // Stop sound when inactive
    }
    delay(100);  // Debounce
  }

  if (systemActive) {
    performAudioMotionSync();
  }

  lastButtonState = currentButtonState;
}

void performAudioMotionSync() {
  // Read potentiometer for control
  int potValue = analogRead(potPin);

  // Map pot to servo position (0-180 degrees)
  servoPosition = map(potValue, 0, 1023, 0, 180);
  myServo.write(servoPosition);

  // Map servo position to buzzer frequency (200-2000 Hz)
  int frequency = map(servoPosition, 0, 180, 200, 2000);
  tone(buzzerPin, frequency);

  // Display current values
  Serial.print("Servo: ");
  Serial.print(servoPosition);
  Serial.print("° | Frequency: ");
  Serial.print(frequency);
  Serial.println(" Hz");

  delay(50);  // Smooth updates
}
🎭 Section 4: Advanced Pattern Control
Automated Sequences and Patterns
Create complex automated sequences that combine servo movements with musical patterns. This section demonstrates advanced programming techniques for coordinated device control.
Pattern Sequence Programming
Create automated sequences with predefined patterns:
// Advanced Pattern Control System
#include <Servo.h>

Servo myServo;
const int servoPin = 9;
const int buzzerPin = 8;
const int buttonPin = A1;

// Pattern definitions
struct Pattern {
  int servoPos;
  int frequency;
  int duration;
};

// Define multiple patterns
Pattern pattern1[] = {
  {0, 262, 500},    // C4
  {45, 294, 500},   // D4
  {90, 330, 500},   // E4
  {135, 349, 500},  // F4
  {180, 392, 500}   // G4
};

Pattern pattern2[] = {
  {180, 523, 300},  // C5
  {90, 392, 300},   // G4
  {0, 262, 300},    // C4
  {90, 392, 300},   // G4
  {180, 523, 600}   // C5
};

int currentPattern = 1;
bool patternActive = false;
bool lastButtonState = HIGH;

void setup() {
  myServo.attach(servoPin);
  pinMode(buzzerPin, OUTPUT);
  pinMode(buttonPin, INPUT_PULLUP);
  myServo.write(90);  // Center position
  Serial.begin(9600);
  Serial.println("Advanced Pattern Control");
  Serial.println("Press button to cycle through patterns");
}

void loop() {
  bool currentButtonState = digitalRead(buttonPin);

  // Button press cycles through patterns
  if (lastButtonState == HIGH && currentButtonState == LOW) {
    currentPattern++;
    if (currentPattern > 2) currentPattern = 0;

    Serial.print("Pattern: ");
    Serial.println(currentPattern);

    if (currentPattern == 0) {
      Serial.println("Pattern OFF");
      noTone(buzzerPin);
      myServo.write(90);
    } else {
      executePattern(currentPattern);
    }

    delay(100);  // Debounce
  }

  lastButtonState = currentButtonState;
}

void executePattern(int patternNum) {
  Pattern* currentPatternArray;
  int patternLength;

  if (patternNum == 1) {
    currentPatternArray = pattern1;
    patternLength = 5;
    Serial.println("Executing Pattern 1: Rising Scale");
  } else if (patternNum == 2) {
    currentPatternArray = pattern2;
    patternLength = 5;
    Serial.println("Executing Pattern 2: Bounce Pattern");
  }

  for (int i = 0; i < patternLength; i++) {
    // Move servo to position
    myServo.write(currentPatternArray[i].servoPos);

    // Play corresponding tone
    tone(buzzerPin, currentPatternArray[i].frequency);

    // Display current step
    Serial.print("Step ");
    Serial.print(i + 1);
    Serial.print(": Servo=");
    Serial.print(currentPatternArray[i].servoPos);
    Serial.print("° Freq=");
    Serial.print(currentPatternArray[i].frequency);
    Serial.println("Hz");

    // Wait for duration
    delay(currentPatternArray[i].duration);

    // Brief pause between notes
    noTone(buzzerPin);
    delay(50);
  }

  Serial.println("Pattern complete!");
}
🛠️ Hands-On Activity: Interactive Output Control System
Project: Sound and Motion Control System
Create a comprehensive system that demonstrates sound and servo control working together. This project will combine buzzers and servo motors with user input to create an interactive demonstration of audio and motion capabilities.
Activity Requirements
- Create button-triggered sound patterns with buzzer
- Implement servo position control with smooth movements
- Add interactive Serial Monitor commands for device control
- Create coordinated patterns using sound and servo movement
- Include safety features and error handling
- Provide real-time status feedback
- Combine audio feedback with servo positioning
Expected Features
Output Control
- Musical tone generation and sound patterns
- Precise servo positioning and movement
- Coordinated audio and motion patterns
- Variable frequency and position control
User Interface
- Serial Monitor command system
- Real-time status display
- Interactive control options
- Error messages and feedback
📝 Assessment & Homework
Quick Check Questions
- What is the difference between active and passive buzzers?
- How does PWM control work for servo positioning?
- What are the main differences between active and passive buzzers?
- How does servo motor position control work?
- What is the typical PWM signal timing for servo control?
Homework Challenges
Challenge 1: Musical Servo Controller
Create a system where servo position controls buzzer frequency. As the servo moves from 0° to 180°, the buzzer plays different musical notes creating a "servo theremin" effect.
Challenge 2: Audio-Motion Alarm System
Build a security alarm with buzzer alerts and servo-controlled "camera" that sweeps while playing different alarm tones when motion is detected (simulated with button).
Challenge 3: Interactive Audio-Motion Display
Design a mood indicator that uses sensor input to control buzzer tone and servo position to represent different "emotions" or states through coordinated sound and movement patterns.