EXPERIMENT 3.1
CONSTRUCTING 3-D ATOMIC MODELS
PURPOSE:
To create models of isotopes of an element.
BACKGROUND
Scientists and engineers use models all the time. Remember from module 1 that a model is a useful simplification used to make it easier to understand things that might be too difficult to directly observe. Good models also allow scientists to make and test predictions. As always in science, models are changed when they no longer explain the data. The globe is a model of the planet Earth. It wasn't until 2005 that the globe was made using actual satellite pictures from NASA. There are computer models, such as weather models, in which scientists use mathematical calculations to predict weather patterns. Engineers build models of bridges or buildings to determine what materials will best suit the parameters of the project. In this investigation, you will build a model of 2 atoms and use them to compare their structure.
MATERIALS:
- 2 small Styrofoam balls (Balls should be about 2 inches in diameter. Styrofoam balls from craft stores work well)
- Pipe cleaners (white or gray)
- Plastic pony beads (These can be found at craft stores)
- 2 bamboo skewers
- Fishing line
- 2 wire hangers
- Red and blue pushpins
QUESTION:
How can the materials listed be used to show the difference between isotopes of an element?
PROCEDURE:
- Choose an element and analyze its isotopes:
- Select one element from the table below
- Use the table information to determine the number of protons, neutrons, and electrons
- Choose 2 isotopes of your selected element (you can build all 3 if available)
- Record this information and isotope names in your data table
Element Atomic Number Isotopes Nitrogen 7 nitrogen-14, nitrogen-15 Oxygen 8 oxygen-16, oxygen-17, oxygen-18 Magnesium 12 magnesium-24, magnesium-25, magnesium-26 Chlorine 17 chlorine-35, chlorine-37 - Prepare your materials:
- Red pushpins = protons
- Blue pushpins = neutrons
- Plastic beads = electrons
- Set aside the correct number of each item for your isotopes
- Prepare the nucleus (Styrofoam ball):
- The Styrofoam ball represents the nucleus area
- Take a bamboo skewer and carefully insert it through the ball
- Leave the skewer exposed on each side
- you will attach the pipe cleaners to the skewer as shown in the picture
- ⚠️ Ask for help if needed - be careful with sharp objects!
- Build your isotope nuclei:
- Insert the correct number of red and blue pushpins into one Styrofoam ball (first isotope)
- Repeat with the second Styrofoam ball for your other isotope
- Attach nuclei to hangers:
- Use fishing line to attach each nucleus to a wire hanger
- Tie the fishing line around each end of the bamboo skewers
- Then tie onto the hanger
- Repeat for the second isotope
- Calculate energy levels:
- Determine how many energy levels your isotopes have
- Record this number in your data table
- Energy Level Capacity:
- • 1st level: holds 2 electrons
- • 2nd level: holds 8 electrons
- • 3rd level: holds 18 electrons
- Construct energy levels with pipe cleaners:
- Build the correct number of energy levels for one isotope
- Pipe Cleaner Guide:
- • 1st energy level: 2-3 pipe cleaners
- • 2nd energy level: 4-5 pipe cleaners
- • 3rd energy level: 5-7 pipe cleaners
- Twist the ends together to make each energy level
- Important: Don't close the circles yet - you need to add beads first!
- Your model should look similar to the reference photo below:
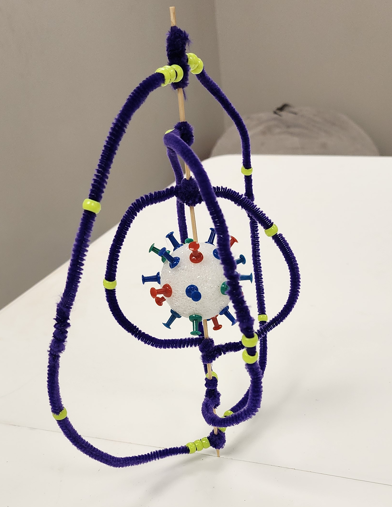
Example of completed atomic model setup
- Add electrons to energy levels:
- Determine the number of electrons in each energy level
- Record this information in your data table
- Place the appropriate number of beads on each pipe-cleaner circle
- Close each circle by twisting the pipe-cleaners together
- Attach energy levels to hanger:
- Use fishing line to attach energy levels to the hanger
- Hang energy levels in the correct order
- Position at the same level as the nucleus
- Complete second isotope:
- Repeat steps 7-9 for your second isotope
- Clean up:
- Put away all materials properly
- Ensure your workspace is clean
CONCLUSIONS
In a conclusion paragraph, answer the following questions: How were the two models you constructed similar? How were they different? Why did both of your models contain the same number of protons and electrons? What are some ways your models were not accurate in depicting the nucleus and electrons of an atom?